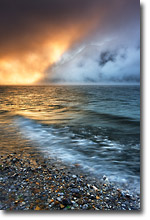
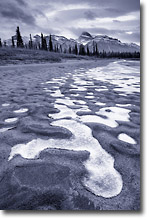
Taming Contrast in Landscape Photography: The Tools We Used Then and Now |
|
Ten years ago when NPN launched, the tools we used to control contrast in landscape photography were essentially limited to what could be done in-camera. If you shot with film there was also the possibility of altering contrast based on how you developed the film or how you made the prints but that ability was really limited to those with the in-depth knowledge of the chemical darkroom. Today, the tools we use in-camera are essentially the same but what has changed are the capabilities of altering contrast in post production (the digital darkroom has much greater flexibility and more accessibility than the chemical darkroom).
Why Bother?
The human eye can see detail in scenes with extreme contrast such as a person backlit against a fiery sunset sky. Film and digital cameras do not have this ability. Where the human eye can see about 20 f-stops of difference in brightness film can see only 5 to 9 stops depending on the film type. Digital cameras are even more limited in their tonal latitude (5-7 stops is typical). One if the keys to successful landscape photography is to learn to see contrast as the camera does and then use techniques to either work with contrast or manipulate the contrast. Let’s take at look at how we did things then and now and which techniques still give us the results we want.
Don’t Fight It – Work With What The Camera Gives You!
Instead of trying to manipulate contrast, simply learn to see contrast as the camera does and then only record scenes that look good with narrow vision of the camera. How do you do this?? With film cameras, I found that if I squinted my eyes nearly shut and looked at the scene before me the contrast of the scene increased and looked very similar to what will be recorded on film--the same technique still works with digital cameras as well. But most people using digital cameras will never use the ‘eye squint’ technique. They do not have to, simply take the photo and then hit the playback button to see how the sensor recorded the scene. If you want to ‘preview’ how the contrast will look before pressing the shutter button on a digital camera simply use ‘Live View’ and the LCD on your camera will do a pretty good job of showing you how the scene will look once you press the shutter button.
A good rule of thumb to remember is that both film and digital cameras have a much easier time recording the full tonal range of a scene when shooting under low contrast light and eliminating the sky (e.g. overcast day or scenes in the shade). Some photographers restrict themselves to this ‘easy to capture’ light especially when concentrating on macro or intimate nature scenes. Personally, I do not want to be restricted to photographing one type of light so I use other techniques to tame the contrast inherent in most outdoor scenes.
Taming Contrast With Filters
Polarizers
The easiest way to reduce the tonal range in an outdoor scene is to use filters to reduce the brightness of the highlights. The most important filter I use is a polarizer. A polarizer reduces reflective glare in scenes which tends to wash out the highlights and colour saturation. The effect of a polarizer can’t be replicated in software. Software ‘polarizers’ just increase saturation and darken blues but they do not remove reflective highlights. To find out more about how and why you still need to use a polarizer even with digital cameras see my article Seven Rules for Effectively Using a Polarizer. Polarizers are as important now as they were ten years ago.
Grads
The other filter that was absolutely necessary for in-camera contrast control with film cameras was the graduated neutral density filter (or grad filter for short). These filters are a combination of one half clear glass (or optical resin) and one half neutral (e.g. gray) glass or resin of varying density. They come in different strengths of neutral density and different transition blends between the dark and light portions.
The theory behind these filters is that often the sky is so much brighter than the land, that film or digital cameras have a hard time retaining details in both areas of the scene. Without a grad filter, the resulting photo may have a bald washed out sky. With a grad filter, the sky retains proper detail. Grad filters were a life-saver for the film photographer allowing high contrast scenes to be recorded more like our eyes saw the scene. To learn more about how to use grad filters see my article The Essential Filters for Controlling Contrast in Digital Nature Photography.
Today, many digital photographers still use grad filters to get ’finished’ images in-camera so they have less post-processing to do after the shoot. Grad filters have become a time-saver for these photographers. But other photographers prefer to make several exposures in-camera to record light and dark areas and then blend these exposures in post-processing to record the wide tonal range of the scene.
Ten years ago blending exposures in image software was relatively rare, today it is common place and is becoming easier with dedicated software programs designed to specifically address the problem. Is one technique better than the other? I use both, if I can get it ‘right’ in the field using filters, then I will. If filters won’t work well, then I will make several exposures and blend the results in software. Sometimes I do a combination of both. In the end if you get the results you envisioned, then it matters not which method you used. The great thing is now we have more tools to achieve the same result.
High Dynamic Range (HDR) Software and Blended Exposures
This option is getting more and more popular with digital photographers because it requires no special gear to take into the field (filters and filter holders). For a high contrast scene the photographer simply takes three or more exposures of the scene using a constant aperture and varying the shutter speed to give a properly exposed mid-tone, shadow, and highlight versions of the scene. These different exposures are brought into the computer and then merged together using special HDR software such as Photomatix (www.hdrsoft.com) into a photograph that retains detail across the entire tonal range. Other photographers use Photoshop and hand-blend the different exposures using layers and masks. There are thousands of tutorials out in cyberspace on how to do HDR photography. In the end HDR can look garish or realistic and a lot depends on the user’s ability to finesse the software and to have a good esthetic sense of natural light. There are as many crappy looking HDR images as there are crappy grad filter shots.
To get good results with either you really need to know how to properly use the tools.
Film photographers, especially those using negative film could get ‘HDR’ results in the darkroom using pin registration systems (to align the different negatives precisely) for printing or by printing a single negative using dodging and burning techniques to selectively lighten or darken areas within the photo. So really, things have not changed that much and HDR is not a new concept, it is just an idea that is widely accessible, fairly easy to use and is very popular now.In The End
What hasn’t changed in ten years is the same old problem of contrast. Most often natural scenes have much more tonal contrast than our cameras can successfully record. As photographers our job is to understand how our cameras see contrast and tonality and either work with that ‘limitation’ or figure out ways to overcome contrast. Today we are lucky to have easy tools to use to manipulate contrast after the fact. Does this mean there are better photos out there now than ten years ago? Has the ‘craft’ of photography been elevated by the new technology? Hardly! I think the quality of photography is now and then (ten years ago) is similar but that today the volume of great photos is much, much higher.
Comments on NPN nature photography articles? Send them to the editor. NPN members may also log in and leave their comments below.
Darwin Wiggett is a professional nature and outdoor photographer from Alberta, Canada. You can see more of his work at www.darwinwiggett.com or at www.timecatcher.com.
