|
|
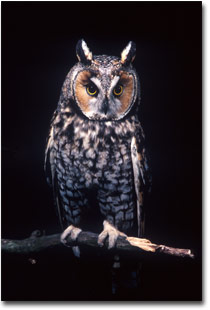
 Flash Primer Photography and Text Copyright Joe McDonald I started using flash with my photography when I was fifteen years old, which is 35 years ago and, in terms of photographic technology, just a step above Neanderthal culture. Back then – and I know I sound like a geezer using that term – the basic electronic flash was a manual mode unit. Camera/flash kits were still being sold that featured light guns using flash bulbs! Technology was at a point where the more sophisticated flashes had an ‘auto’ sensor which read the reflected light off a subject. The first one I purchased was so disappointing that I quickly returned to the “tried and true” manual mode method to determine exposures. Obviously, TTL flashes did not exist, so if you wanted to use flash with any degree of skill, you had to understand what you were doing. Today, of course, there’s TTL flash, which works so well so often that one might be tempted to say that there’s no reason to understand flash. But even though the flash exposure might be correct, the image may be unsatisfying. There may still be blur, or black backgrounds, or just that ‘flashed’ look that appears so unnatural. Of course, truly understanding flash will improve all of your flash images, but nevertheless you should use flash judiciously. Whenever we teach flash photography, whether that’s at one of our weeklong workshops or at a seminar, I stress this point: I use flash as a last resort, when natural light cannot capture the images I envision. And when might that be? The most obvious example would have to be when there simply is no natural light to use. Consider photographing an owl at night, an impossibility without flash. I also use flash when I wish to freeze action without sacrificing depth of field in daylight situations. For example, I’ve photographed tree swallows flying into a nest without flash – at 1/2000th sec with ISO 100 film, but even on a sunny day my aperture was no better than f4. Not very much depth of field there! With flash, I could shoot those same swallows at f32, with a flash duration of 1/15,000th of a second or more – giving me both action-stopping speed and great depth of field. Flash is also extremely helpful to mitigate the effects of high-contrast light. With flash one can make acceptable if not outstanding images in mid-afternoon on a sunny day when the normally harsh shadows would ruin a natural light exposure. However, here’s where my warning about using flash really comes into play. If you're shooting in a high contrast situation, ask yourself, is there anything else you can do that would improve the image without resorting to flash? If your subject is small enough, and your working distance permits, a diffuser held over your subject might eliminate all the distracting contrast. Likewise, a reflector could be angled to fill in shadows, or you could use both to achieve the effect you wish. While someone skilled with flash can create just about any effect desired, for the inexperienced or less skilled, it is a heck of a lot easier to improve existing light with diffusers or reflectors, since the effect is apparent as you manipulate them. With flash you cannot see the finished product until you get your film developed and, by then, the photo opportunity could be long gone. Digital imagery provides an advantage here since you see the results immediately but isn’t of much value if you cannot understand why a shot failed. To use flash effectively, you must understand it. In this installment, we’re going to limit ourselves to the easiest concept to understand – using a flash in the absence of ambient light. So let’s consider the owl.
This ability to stop action depends upon the unit’s flash duration, that is, the length of time the flash pulse is emitted. The shorter the flash duration, the ‘faster’ the flash, so to speak, and progressively faster actions can be stopped with shorter and shorter flash durations. At extremely fast flash durations, one can stop a bullet in mid-flight! Conversely, longer flash durations act like slower shutter speeds, thus a ‘slow’ flash pulse may result in your capturing only a blur. With TTL, this flash pulse also determines the exposure. At a particular flash- to-subject distance, the flash pulse will be longer if a small aperture is used, and shorter with a wide aperture. Make sense? Consider a natural light exposure. If f16 requires a shutter speed of 1/125th sec for the correct exposure, for example, f4 would require a shutter speed of 1/2,000th. Whether it is with natural light or with flash, light has to pass through the lens for a longer time if it is passing through a small aperture opening and for a shorter time if passing through a large aperture opening. Note that I said ‘at a particular flash-to-subject distance.’ The duration of the flash will be longer the farther away the flash is from the subject until, at some point, it reaches its maximum flash duration. I think what confuses people most when thinking of flash is simply the fact that it is just a pulse of light. Unlike a continuous light source, like the sun or your handy flashlight, whatever the flash is going to accomplish must be done in a relatively brief period of time. Thus, if a combination of factors requires more light than the flash can emit, the image will be underexposed. The flash can only be on so long, generally no more than 1/800th or 1/1000th sec. Underexposures typically result when a subject is too far away for the light to reach or when too small an aperture is used, or a fatal combination of the two. Thus a smaller aperture requires a shorter flash-to-subject distance, and this is clearly shown if you look at the bar scale on the back of most TTL flash units. Conversely, the flash duration decreases as the flash is moved closer to the subject until, at some point, it reaches its minimum duration and cannot shut off any more quickly. Moving closer, the flash would overexpose the subject. On most TTL flashes, the distance scale shows this minimum distance which also represents the flash’s minimum, or fastest, flash duration. As you move the lens aperture ring, you’ll see this range changes. 
The TTL sensor responds to all of these factors – the aperture and the flash-to-subject distance and directs the flash to emit an amount of light, that, in theory, is just right for the aperture used. Further, the TTL sensor adjusts the flash exposure based upon the subject’s reflectivity. A dark subject absorbs light, so the flash pulse will be longer in order to compensate. A light subject reflects more light, so the flash pulse will be shorter. Of course, if you don’t compensate for this, TTL flash exposures of black subjects may be overexposed or gray looking, and TTL flash exposures of white subjects may be underexposed, and again, gray-looking. Remember, the TTL sensor is geared to produce a middle tone whether it is in fact middle toned, or black, or white. Generally, to correct this I dial in a –1 TTL flash compensation for black subjects, and a +1 flash compensation for white subjects. Now, let’s look back at the owl example I mentioned earlier. In the absence of light, TTL should provide a properly exposed image provided the flash is close enough for the aperture used. If the owl is flying,
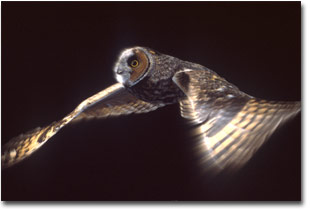
Unfortunately, there is no way you can predict precisely what the flash duration will be since it is dictated by the subject’s reflectivity, the flash-to-subject distance, and the aperture in use. Getting a good exposure and having the right flash duration for the job required are not the same thing. How great a distance is too far, how small an aperture is too small? It’s impossible to really say as it depends on a lot of variables that simply cannot be defined. Sounds pretty hit-or-miss, doesn’t it? You bet, but that’s the trade-off for using TTL flash. It’s automatic, and it works, but you still have to do some thinking, and even then, it’s not a guaranteed result. To recap, you will have the longest flash duration at the maximum working distance for the aperture in use. Wider apertures will always yield faster flash durations at a given distance on a given subject. You’ll have the shortest flash duration, which may be as fast as 1/50,000th sec, at the minimum working distance for the aperture in use. But between that minimum and maximum distance the flash pulses will range between as slow as 1/800th and as fast as 1/50,000th sec., which is pretty unpredictable if you need a specific duration to stop a given action – like the wing beats of a flying owl. So, how do you stop a flying owl? With TTL flash, you must have the flash close enough and the aperture wide enough so that you can reasonably expect the flash duration to be fast enough to freeze the action.
After reading all this, you might wonder if I even use TTL flash. I do, and I find it indispensable and easy to use for subjects that simply require either full or fill flash. I’m not knocking TTL flash by any means, I’m just pointing out its limitations as I build upon your flash knowledge. We’re going somewhere with this, and in our next installment we’ll expand your knowledge base. Remember that flying tree swallow? Well, we’ll have you up and running for any flight shots you’d like to do in June! Joe and Mary Ann - NPN 020 Comments on NPN flash photography articles? Send them to the editor.
Joe has been a full-time nature photographer since 1983, and Mary since 1989. They have led photo safaris to all seven continents, and spend as much as 20 weeks per year in Africa. Their work has appeared in every major natural history publication in North America. Joe is an active member of the Outdoor Writer’s Association of America and a former board member of the North American Nature Photography Association. Mary is a first place winner in the BBC/BG and Nature’s Best photo competitions. Joe and Mary maintain an active website that offers many features, including tips and questions of the month, a viewer’s gallery, product reviews and links, and trip reports and portfolios. Complete photo and digital course and photo tour descriptions are available on their website, www.hoothollow.com. |
|
|
 At night, the flash provides the light for the exposure. If the owl is in flight, the flash may also stop that action. While a bright flood light could theoretically provide enough light to make an exposure of a perched owl, it would not be bright enough to permit the use of a fast enough shutter speed to stop a flying owl, unless of course, you were using a very light sensitive film, ie one with a very high ISO. So you see, the flash not only provides light, it also acts like a fast shutter to freeze motion.
 the exposure might be OK, but the owl may be blurred. Why? If your flashes are too far away, or the aperture is too small for that distance, you might have too slow a flash duration to freeze the action.
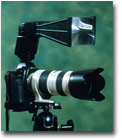
 You can increase the flash duration at a particular distance by using a tele-flash like the one offered by Visual Echoes, since the light will be concentrated into a smaller area. Since more light hits the subject, the flash need not be on as long, hence a shorter flash duration. Of course, if you’re using an off-camera flash, you have to be very careful how you’re aiming this more tightly focused beam of light.
 Joe and Mary Ann McDonald conduct photo and digital workshops at their home in Hoot Hollow, Pa., and lead photo tours and safaris around the world. Joe is the author of 6 books on wildlife photography and 1 on African wildlife; Mary is the author of 29 children’s books on natural history. Joe is a columnist for Outdoor Photographer Magazine, and Joe and Mary are columnists for photosafaris.com and Keystone Outdoors, and field correspondents for Nature’s Best Magazine.