Introduction
Itís that time in the evening, when the sun has set, the clouds have put on their show, and the first stars are beginning to shimmer through the twilight blues. Itís one of the most peaceful and tranquil moments of the day, second only to predawn, but youíre probably packing your bag to make sure you get back to the car before darkness descends. Soon the stars come out in full force, lighting the sky with points of light stretching away for many light years. Take a minute and look up, itís a wondrous sight. If youíve never sat deep in the wilderness miles from civilization and simply watched the light retreat from east to west and the stars dance in circles around you, youíre missing out.
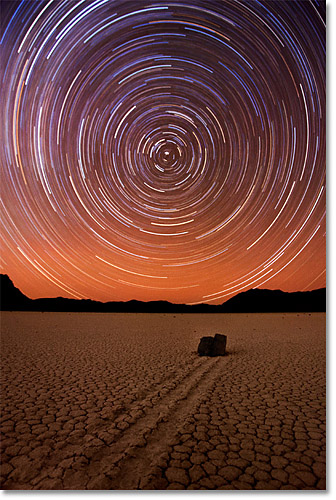
"Rocks Racing Stars" - The Racetrack, Death Valley National Park, California
The Technicals: Canon 20D, 10-20mm
Exposure: ISO 400, f/5.6, 2.5 hours over 5x 30-minute increments (my first real attempt), started soon after twilight.
Enough with the poetry. Now your question is, of course, how do I actually photograph this incredible beauty? Itís likely youíve tried, yet couldnít quite capture the color, the delicate light dancing over the land around you, the first twinkles of stars, and the subsequent circles traced out by the stars around Polaris. In this article I will share with you how to go about capturing that magic, from the preconception through to the finished product. Most of this article will concentrate on how to capture a stunning startrail photograph, though much of it is relevant to capturing that fleeting moment of twilight. This is a complex process involving more planning and technique than most photos, so sit tight and get ready to learn! Note: I use a Mac, so all my photoshop directions are for a Mac, but theyíre probably similar for a PC.
The first step in creating a successful photograph is generally some sort of pre-visualization. The beauty of star trails and previsualization is that they are very predictable. Eventually you will get a clear night at your desired location and youíll know exactly what those stars will do. For "ordinary" golden hour photography, getting the right clouds, mist, or ethereal light requires more luck and patience to get exactly what you picture in your mind. And of course once that happens, it will never happen quite that way again ñ it is unique. On every clear and calm night, however, star trails will look nearly identical to any other day (sure the constellations will be in different positions, but for nearly every application this wonít make a difference). As a result, a startrail photo can easily become clichÈ, the stars and sky will not be the unique part of your image. What will make your photo special is where you chose to take it, what the foreground is, and how it relates to the circling heavens above. For myself, star trails show three things: geometrical shapes, motion, and the revealing of an invisible force. As a result, I strive to find foregrounds that will resonate with those qualities, making for a final image that hopefully speaks to you on an emotional and/or intellectual level.
Planning and Preparation
Suppose you have an idea for what image you would like to capture. Now how do you go about doing it? First, youíll need to determine when is the appropriate time to shoot. Yes of course, at night. Ok, do you need the moon up so that you can get light on your foreground? If so, what phase should it be in (ie. How much light do you need for the foreground?). What time do you want to start shooting (ie. How much light do you want in the sky), so what time do you need the moon to rise at or set by? How high in the sky do you want the north star, if you want it in the frame (this will depend on the time of year). As you can see, there are a lot of questions to be considered, but fortunately there are also some guidelines you can follow. In the following sections Iíll give my advice for where you might start.
To summarize, youíll need to consider the following:
- Location: Far away from cities! City glow can ruin the sky with weird colors and give you less stars.
- Time of year: Position of the stars (likely not a big factor), direction of the twilight glow.
- Moon phase: The two or three days around full moon will give you a lot of light, and less stars.
- Moonrise times: The full moon rises roughly at sunset.
- Sunset/sunrise times: This will determine when you can start shooting. More specifically, civil twilight times are about an hour after sunset.
- Weather predictions: Youíll want a clear night, but some clouds can add a nice ethereal character to your image.
The very first step in creating a successful twilight or star-trail image is preparation. You might be leaving your home, car, or tent in the last hour of light, but youíll be returning long after dark. At the very least, you should make sure you have a way to return safely!
- Know the way back to the car! I highly recommend a GPS for this, as it can be useful in tagging your tripod as well, in case you want to leave and come back later. A compass and topo map will help in more remote areas.
- Headlamp. Itís going to get dark, and you better have a light an extra batteries.
- Warm clothes. As the night sets in, it can get chilly very fast! Bring a warm jacket, hat, and gloves if itís that time of year.
- Food and water. If youíre headed out for a 3 hour exposure, youíll want something to drink and nibble on.
- Something to do. Often I am content to just sit there and stare at the heavens, but you might want a book or some music to pass the time.
- A pad to sit on. The ground gets cold, and youíll likely be wanting to take a seat. Bringing a foam pad to sit or lie down on will make you much more comfortable. Consider bringing a sleeping bag and settling in for a few hours while your camera is taking the picture.
The photography equipment:
- Your camera.
- A programmable remote (for Canon the TC-80N3).
- Bubble level.
- Compass and declination (found on topo maps of the area).
- Sturdy Tripod and perhaps something to weigh it down.
- Rocket blower (this can be helpful if dew starts to settle on the lens, blow on it with the rocket blower occasionally and this will reduce the effect).
- Lens hood (again, for dew protection).
- Extra batteries (or external power source, a camera grip with the extra battery would be a good idea if youíve got one).
Collecting Starlight ñ the Exposure
There are a lot of variables here and I suggest you try a few things before you settle on something. Essentially there are two values that set the exposure: ISO rating and aperture. The shutter speed will primarily determine how long your star trails are and if you do have a foreground in the frame, it will affect the exposure of that. For different cameras, you may find different results, but I have found that for dark (moonless) nights, iso 400 and f/5.6 seem to be ideal for most applications.
If the moon is in the sky, the exposure can dramatically change and your foreground will be getting a lot more light. In this case, the exposure time will be important. For a full moon night, ISO 400 f/5.6 and 5 minutes should still be in roughly the right range.
One of the biggest disappointments of many star trails images I have seen (second to the lack of an interesting composition) is that the trails are simply not long enough. The stars either need to be frozen, or they need to be long enough to compliment the composition, otherwise the sky just looks messy. The longer the lens, the shorter your exposure needs to be because the relative motion of the star is longer. Also, the length of the trails depend on the distance from Polaris. Polaris hardly moves at all and the same goes for nearby stars. Through personal experience I have found that for ultra-wide angles, 15-20mm (on a full frame SLR) and including the full circle around Polaris, you need a minimum of about 2-3 hours to get a successful image, the longer the better.
The Light ñ Itís All About Timing
While the stars are brightest in the middle of the night with no moon, the rest of the landscape, including the sky, looks a lot better when thereís still some light out so you can see and photograph it. I have found that by starting the exposure during twilight, when there is still some glow from the recently set sun results in a nice deep blue sky, a pleasing gradient, and just enough light on the foreground, depending on what youíre shooting. Of course bright foregrounds will be easier to expose for. As I will explain later, my preferred exposure is ISO 400, f/5.6 for 5 minutes with a sequence of 20-30 exposures layered in Photoshop. As soon as I find that the setting results in no blown highlights, I start collecting light. It would also be good to note that air traffic is least in the early morning (1-3 am or so), so if youíre having trouble with planes, that might become a factor.
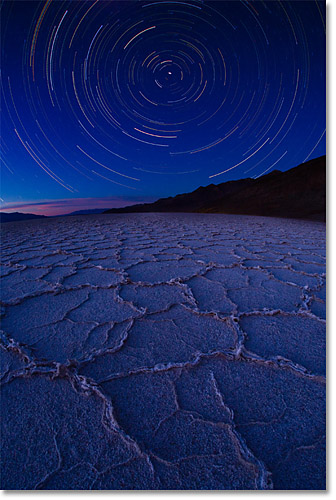
"Geometry of Motion" - Badwater Salt Flats, Death Valley National Park, California
The Technicals: Canon 5D, Sigma 15mm f/2.8 fisheye (with some distortion correction)
Exposure: ISO 400, f/5.6, 32x 5-minute exposures blended, started at twilight.
Alternatively, you can time your exposure so that at some point, the moon casts light on the foreground. The more moon, however, the less stars will be recorded. Furthermore, if the moon is high in the sky, your image will end up looking like an oddly warm daylight scene with stars. I have never had the chance to time a twilight image to moonrise, but I imagine that could be quite successful. Another option is to "lightpaint" ñ using a flashlight (or flash) to light up the foreground during the exposure. Getting this technique right takes practice, but you can get some neat effects. For a natural look, I recommend using an LED light, as the blueish white balance works better with the night sky than the yellow tint from an incandescent bulb in many cases (of course, it depends on your sky).
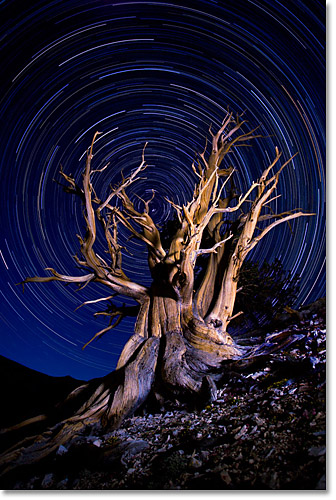
"Essence of Time" - Bristlecone National Forest
The Technicals: Canon 5D, 17-40mm, LED headlamp
Exposure: ISO 400, f/5.6, about 25x 5-minute exposures, started at twilight
Lightpainting: In the last exposure I used ISO 800 and used my headlamp to paint the tree from the side.
Setting Up The Shot ñ Finding the North Star
So if youíre following my advice, youíre setting up your shot while itís still light out so you can get the optimal composition, but you canít see the stars yet! Of course, if itís dark and you can see the stars, then you canít see the land very well, so getting a nice composition will be difficult. The hardest ones to set up are those that including the north star, Polaris, in the frame. Compositions tend to work best with Polaris in the middle and not too high up in the picture you so get complete circles around Polaris.
So how do you get Polaris in the right spot? Thatís where your compass and map come into play. You need to point your camera to true north. The compass, however, points to magnetic north, which lies in Northern Canada near Ellesmere Island. The declination, found on your topo map, will tell you the difference in angle between true north and magnetic north. Using this and your compass, you can find true north. Then you can point your camera in that direction and find yourself a nice composition (before itís dark). As soon as the stars start to twinkle, youíve got to work fast. You want to double-check your composition before committing 3 hours to it. So shoot a test shot of about 5 minutes (depending on the focal length), just long enough so you can see some rotation. This will help you find the north star, and just to double check itís position, hopefully youíre not far off. It can be useful to note that if you can find the big dipper, the two stars marking the end of the dipper point to Polaris, and the last two stars in the little dipperís handle point to it as well. Knowing where it is in the sky comes with practice, or you can look it up in some star charts to play it safe. Sky and Telescope has access to free star charts online if you register with them.
Shooting The Twilight
As I mentioned earlier in the article, star trails can get clichÈ very quickly. But fortunately, you have an alternative ñ to photograph static stars with twilight or moonlight. For twilight images, I like to take an exposure during the last glow of pink in the sky and then come back an hour later when the stars are out in full force. Then I will take another exposure. Then after returning home Iíll put the two images in a stack in photoshop, and use a lighten blend mode to bring out the stars. Due to the incredible dynamic range at this hour, you will likely need to take three exposures.
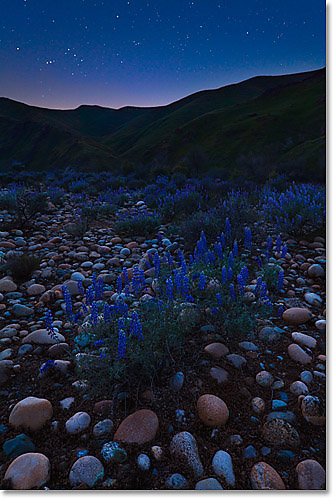
"Cosmic Patio" - Lupines in the Kingís River Canyon, California
The Technicals: Canon 5DmkII, 16-35mm mkII @ 23mm, tripod
Exposure 1: ISO 400, f/16, 1.5 minutes (foreground/hills)
Exposure 2: ISO 1600, f/16, 30 seconds (sky, 30 minutes later)
Exposure 3: ISO 3200, f/2.8, 15 seconds (stars, another 30 minutes later)
Recommend Exposures
- Foreground: Photograph the foreground shortly after twilight, something like iso 400, f/16 at 30 seconds to several minutes.
- Sky: Take this exposure when there is still some nice gradient and color in the sky, but before the stars are completely out. I like shooting into the sunset so that I get a slightly pink gradient in the picture.
- Stars: Use your widest aperture (this is a good excuse to buy an f/2.8 lens) and an ISO of around 1600-6400. On modern cameras I recommend 3200 at a minimum. Depending on the focal length, you will need to use an exposure time of 10-15 sec, 30 sec at the absolute longest on a super wide angle, to freeze the stars. Donít forget to take off the polarizer if you tend to leave it on!
Again, anyone can photograph stars, so I urge you to take the time to find a composition that truly works under the twilight light. When shooting with a wide angle, the stars can often become tiny and insignificant. One easy solution is to photograph them slightly out of focus. This will make them appear larger and a little fuzzy, as seen below. Another trick is to use a method of increasing the ëglowí or luminosity of the stars. To do this in Photoshop, flatten your image, duplicate it, set the blend mode (located above the layers palate) to "lighten", and apply a light Gaussian blur of 5-40 pixels, depending on the resolution. Restrict this glow effect to the stars, and turn the opacity to taste.
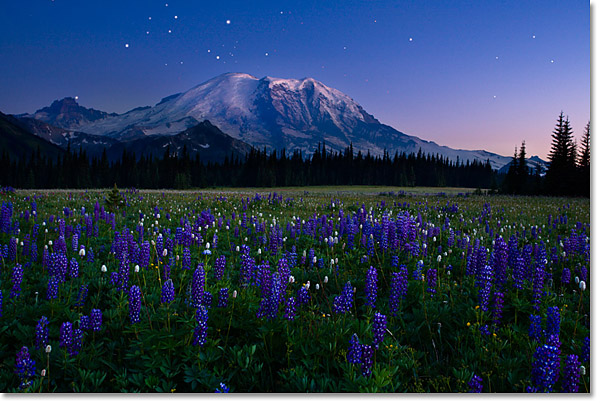
"Twilight Blues" - Mt. Rainier National Park, Washington
The Technicals: Canon 5D, 17-40mm
Exposure: 4 exposure blend:
1. (For the foreground) ISO 400, f/11, 2 minutes
2. (For the mountain) ISO 400, f/11, 2 minutes, shifted focus from the foreground exposure
3. (For the sky) ISO 400, f/11, 25 sec
4. (For the stars) ISO 1600, f/4, 15 sec, shot 1 hour after the previous three
Processing: first 3 layers blended normally, last layer in "lighten" mode. Due to the poor quality of the stars, I went in and manually retouched the stars with a paintbrush to make them look pretty. A faster lens (like an f/2.8) and the high ISO (3200-6400) of modern digital SLRís make it much easier to get high quality stars.
Taking the Picture ñ Star Trail Techniques
Photographing star trails with a digital SLR is a much more involved experience than it was with film. With film you could simply flip up the mirror, go to bed, and come back a few hours later and youíd have yourself a photo (after making sure of the sunrise/sunset, moonrise/moonset, and picking a clear moonless night of course). With digital, however, there are some additional hoops to jump through. So why use digital at all? With film there were problems with reciprocity, meaning the films sensitivity to various kinds of light changes with longer exposures, and it can be hard to predict unless you know your film well. Also due to the limited dynamic range, getting some light on the foreground is a much more challenging proposition. But for really long exposures, digital might make your life a lot easier (it is interesting to note that cameras such as the Canon EOS 620 do not expend battery power to keep the mirror up, while most other cameras do).
Noise is the number one enemy you will encounter. Once you start to push your exposure beyond a few minutes, the noise starts to increase significantly. We call this long exposure noise. Also, different parts of the camera will heat up and affect how the sensor works. Most (if not all) cameras will exhibit some kind of magenta colored bloom in a consistent spot (different for different cameras). There are a number of solutions to consider.
As the temperature drops, the signal to noise ratio gets better, and your noise will decrease. So if itís -15 degrees F outside, you might very well get away with a 2-hour straight exposure without much noise! But itís not that usually cold (thankfully!). So for those warm nights you have two other options: long exposure noise reduction (available in most cameras, or it can be done manually using dark frames), or taking multiple exposures and stacking them (or a combination of both). I have not found the long exposure noise reduction to be very effective at all, so I turn it off and use multi-exposure stacking.
Shooting Multiple Exposures
The idea here is to sequentially shoot lots of shorter exposures. The length of each individual exposure will depend on the tradeoff between noise and processing time/power required to assemble your final image. I find 5 minutes to be a nice number (so for a 2-hour exposure youíll need 24 exposures). For most cameras, anything beyond 30 seconds needs to be done through the ëbulbí command. If you plan on trying this, I recommend getting a remote for you camera that lets you program such commands so you donít have to manually sit there and press the shutter (for Canon that would be the TC-80N3). For the TC-80N3 youíll need to set the time between exposures to 1 second (it doesnít shoot multiple exposures if you leave it at zero).Turn off long exposure noise reduction and mirror lock up. You want as seamless a series of images as you can get for star trails.
I should note here that batteries donít last forever. Your battery might only last for an hour or two at the most. Using a battery grip or external power supply from somewhere like www.digitalcamerabattery.com might be a good idea. Otherwise you have to be really quick with replacing a dead one (itís possible, Iíve taken that approach quite often)! Cold temperatures will reduce their efficiency.
Processing and Stacking Multiple Exposures
When processing your raw files, be sure to have the settings the same for each file. In particular, choose a white balance setting that makes the twilight exposure(s) look right, then use that same setting for all your conversions. If you're shooting jpeg, you should probably select a manual white balance in camera so that they all end up the same.
Now you have a set of 20-30 exposures all shot and processed using the same settings, but you need to assemble them into one image. This is where things get complicated and attention to detail is important if youíre interested in the highest quality. The simplest method is to open all your files in photoshop and stack them in "lighten" blend mode (the blend mode is located as a drop down menu in the layers palate). There is an easy way to do this if you have CS3 or higher:
1. Process your raw files (or jpegs), and save them to a folder.
2. Open Photoshop.
3. Navigate to File-Scripts-Load files into stack.
4. Select the files you wish to merge and select "Create smart object after loading layers."
5. Then go to layers-smart objects-stack mode-maximum.
6. To get rid of the smart object and get a regular layer, you can then flatten the final image.
Essentially for each pixel in the image, photoshop will choose the brightest pixel of all the layers in the stack. Since the stars are the only things changing (usually), this will simply draw out your star trails. But now if you zoom in to 100% you will see gaps, like this:
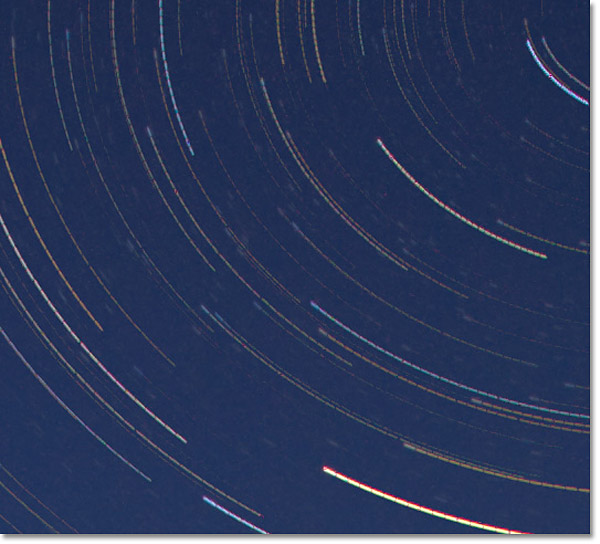
Star trails using the lighten blend mode method.
32x 5-minute exposures taken at ISO 400, f/5.6, with the Canon 5D and Sigma 15mm f/2.8 fisheye lens, stacked using lighten blend mode.
After you resize to a normal web size (800 or so pixels in the longest dimension) you wonít really notice the gaps, but in a nice print you will. You could sit there and use the clone tool to fix every gap, but if you have 25 exposures and 100 bright stars, thatís already 2,500 clone fixes ñ not something you want to do. There is one other possibility that sometimes works (only if you shot the circular pattern of the stars rotating around Polaris). This approach, however, only works if there is hardly any distortion in the picture, which doesnít really happen with wide angles. Itís also really hard to get the center of rotation just right.
1. Duplicate your flattened image.
2. On the duplicate image, select the entire image with the crop tool.
3. Move the center of the crop box (there is a little cross hairs) to the center of rotation of your star trails. Choose this very carefully.
4. Move your mouse to one of the corners, and rotate the image just a little.
5. Select this image, and paste it on top of the original
6. Set the blend mode (located in the layers palate) to "lighten."
7. Crop a little or use the clone tool or layer masks to get rid of the white edges in the corners.
Lighten Screen Blending (LSB) ñ Advanced Multi-exposure blending
Naively you might think that those gaps are there because of the slight break in time between exposures. For a long lens you might be right, but for an ultra wide angle, one second is insignificant. The gaps are there because of the blend mode. If you try using the "screen" blend mode the gaps disappear! But, then the sky becomes much too bright, so the key is to use a clever combination of the two.
This method overcomes many of the shortcomings of just using "lighten" layers. This works best if you shoot raw. First, lower the exposure by 1-stop (alternatively you can do this in Photoshop after you're done). When doing your raw conversion use a "linear" conversion. That means you will do no curves, levels, or contrast adjustments in your raw conversion (for ACR set all the values except white balance and saturation/vibrance to zero, make sure to set the tone curve to linear as well). This will make the image look very low in contrast, and you probably will not like the result. We will fix that later but for now, using a linear conversion is critical, otherwise you will be affecting each end of the star trail, making the gaps more pronounced. Save the files as Tiff or psd in a new folder.
Load your files into a stack (using file-scripts-load files into stack), but do NOT convert them to a smart object. Now you are going to perform a little algorithm, alternating the use of screen and lighten layers strategically to get rid of those little gaps.
Now suppose you have the following layers:
Layer-1 (the background layer), Layer-2, Layer-3, Layer-4 (the top layer in the stack)
You want to duplicate each layer, except for the first and last:
Layer-1, Layer-2, Layer-2-copy, Layer-3, Layer-3-copy, Layer-4
Now set layer-2 to blend mode "screen" - select it and layer-1 and merge them (select both and hit command + e, or go to layers-merge layers). This is why we reduced the exposure earlier, because now youíre essentially adding exposures. Set this new layer to ëlightení blend mode. Now do the same for each successive pair,so set layer-3 to blend mode screen, and merge it with layer-2-copy, then set the new layer to lighten.
After doing this for all your layers, you will end up with a stack of layers all set to ëlightení blend mode, and by strategically using the screen blend mode we have made sure each gap is filled in. The image will appear flatter than you likely would want it to be (thatís because we used a linear conversion on the raw files). Now flatten the image and go ahead and do your normal processing, using curves, levels, etc. to bring the contrast back to the desired levels. If done properly, you should get something like this:
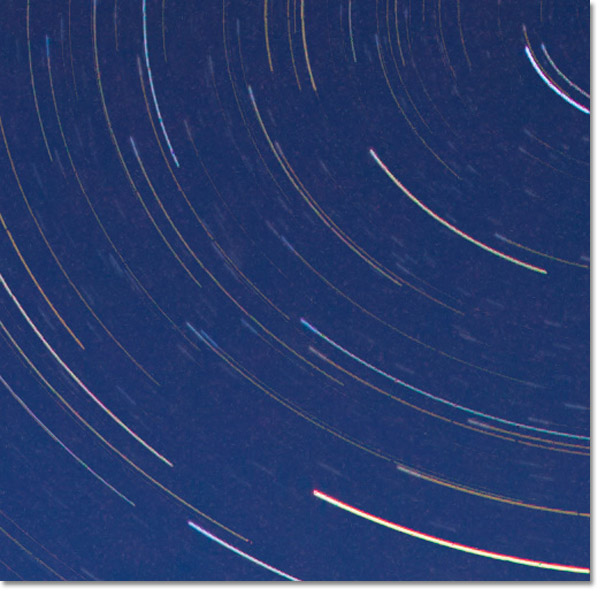
Star trails using the Lighten-Screen-Blend (LSB) algorithm.
Same files as before, processed at -1 exposure in raw and blended using the LSB method. No further adjustments are needded. There are still some odd variations in the stars, which I cannot explain. The two main gaps you do see are because I had to replace my battery, twice, thatís why I suggest you get an external power supply.
If you could have a low noise 2-3 hour exposure (ie. on a very cold night, or some time in the future with better cameras), youíd be better off doing that, why waste your time processing? But for the time being, and under most conditions, this will likely be your best bet.
A Note on Dark Frames
If you want to get into astrophotography, I recommend you do some more research and read a book. There are many techniques that are much better for getting detailed images of stars (not star trails), including the use of dark frames. I have not found dark frames to be useful with my cameras and techniques with the twilight hour (where only the brightest of stars come through), but you might find them useful ñ I recommend you do a search on Google.
Summary
1. Plan and prepare: Consider location, time of year, sunrise/sunset, moonrise/moonset, moon phase, etc. and how each of these might affect your proposed image.
2. Before you head out the door: Have a safe way back to the car and be prepared for spending some time alone in the cold and dark. Bring a headlamp, GPS, warm clothes, food, water, and something do.
3. Compose your shot early: Donít wait until the stars are out or you will miss the best light. Bring a compass to help you find the north star and take a test shot.
4. Exposure: I recommend trying multiple exposures, each of ISO 400, f/5.6, 5 minutes. Use a programmable remote to make your life easier. Remember: itís not just the star trails youíre exposing for, but also the foreground and sky. I recommend starting soon after the first stars start to appear, and use a moonless night unless you want to lighten up the foreground more (in that case shoot around moonrise/set).
5. Multiple Exposure Technique: Use a programmable remote (for canon the TC-80N3), set your time between exposure to the minimum (1 second), and turn off long exposure noise reduction and do not use mirror lock up.
6. Static Stars and Twilight: I recommend taking three exposures, one for the foreground at twilight, one for the gradient in the sky (half an hour later or so), and one for the stars (another half hour to an hour later).
7. Power constraints: Most batteries donít last as long as you might want to shoot for. Depending on the temperature, your battery might only last about an hour. Use a battery grip or external supply to make your life easier or be really quick in replacing a dead battery!
8. Processing: For an easy solution stack everything in "lighten" blend mode. For high quality results, use the LSB algorithm described above.
Comments on NPN landscape photography articles? Send them to the editor. NPN members may also log in and leave their comments below.
Floris van Breugel is a Pasadena based nature photographer with a passion for anything from birds to desolate deserts and high mountain peaks. He was born and raised in California's Bay Area, and he spent much of his childhood exploring the California landscape from the Sierras to the Southern Deserts with his parents. His interest in art started with painting, which has greatly influenced his current photographic style of elegant simplicity. He bought his first first digital SLR, the Canon 20D, in 2006 to photograph birds. Since then he has expanded his photographic vision to include the entire natural world. To see his extended portfolio please visit ArtInNaturePhotography.com.