My telephone rang. It was news from my publisher giving the go-ahead for my first book, Watchable Birds Of The Rocky Mountains. When the excitement ebbed, the reality of the situation dawned on me. Although I had approximately thirty percent of the necessary images, I still needed photos of 40 different birds; not just any birds, but 40 specific species. And, I only had a year to photograph them. I began thinking, ōWhat have I got myself into?ö
I began formulating plans to accomplish the task at hand. How was I going to photograph a particular species if I could not locate it? Not only was it important to have the proper equipment and know how to use it, I needed to know when and where to locate my subject.
Fortunately, for me, my plans worked. Some might say I was lucky. However, with proper planning, the harder I worked the luckier I became. A year later I had all the necessary images. That was several years ago. Since then, I have added images of many species to my stock library, and formulated what I call the ABCs of bird photography, the how, when and where of photographing birds.
A - Know Your Subject
A white-tailed ptarmigan, although I do not recommend doing this, will often allow you to lift her from her nest and show absolutely no alarm or distress. Yet a red-tailed hawk may abandon its eggs if approached too closely during incubation. However, if you wait until the eggs have hatched, it will often demonstrate a little more tolerance. The need to know this, and similar information, is critical to anyone wanting to photograph birds. Otherwise, we could very easily be the cause of a bird abandoning its nest.
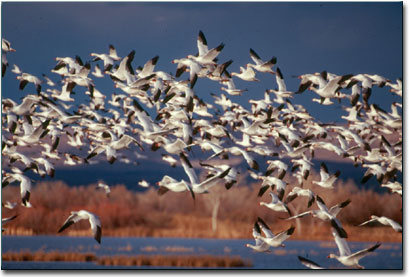
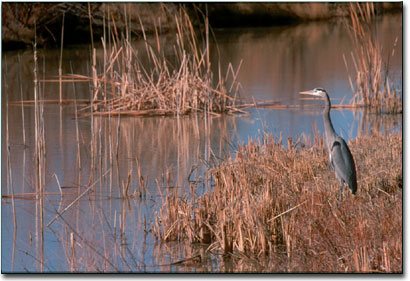
Where is the best place to photograph wood ducks? What is the best time of day to photograph them? What time of year should I plan my trip? Regardless of the species, piping plover or great blue heron, the more information you have at hand, the more successful you will be in locating your subject, and making classic images.
There are many sources for this type of information. Scientific journals provide a wealth of information. Search the pages of The Auk. The American Ornithologist's Union publishes a bimonthly series called The Birds of North America, each release featuring a different species. Inquire at your local public library, and university library concerning these publications, and others. Contact biologists working with state wildlife agencies, and those employed by the U.S. Fish and Wildlife Service. Many county governments employ biologists and do not overlook personnel at state and national parks, as well as national wildlife refuges. Natural history museums contain a wealth of research information and scientists who can answer your questions. Universities conduct research year-round. If the person you speak with is unable to answer you question, ask them to point you to someone who can. Local Audubon clubs and ornithology organizations are good sources of information concerning local species. The Internet provides unlimited contacts and resources.
Do not limit your queries to local contacts. New York and California are as far away as your telephone. A wealth of information is virtually at your fingertips. Directory assistance will help you with phone numbers.
When someone has performed ōabove and beyond the call of dutyö in helping you, follow up with a letter of thanks, and maybe even a photo. What a way to make a lasting friend!
And last but not least, conduct your own research in the field. Among members of a species known to be highly sensitive, certain individuals may be more tolerant. Likewise, to say all members of a more tolerant species can be photographed without any negative impacts would be unfair to shy and high-strung individuals. Only through personal observation and record keeping will you be able to detect these differences. Let us restrict our photography to individual birds that show little concern over human presence, and even then, let us exercise extreme care.
B - Know Where To Go
Knowing where to find birds is critical, but even more important is knowing where to find birds that are easily photographed. This is especially true if you are a beginning bird photographer. Birds accustomed to the presence of people are typically easier to photograph. Likewise, birds who are accustomed to being fed are obviously easier to approach than birds accustomed to being hunted.
Your backyard is a great place to start, providing you have a number of strategically placed bird feeders. Use different types of feeders. A suet feeder will attract different species than a feeder filled with a typical mixture of wild bird seed. Similarly, a platform feeder will attract yet another group of birds. A good book on feeding birds will help you determine which feeders attract which birds, as will a talk with personnel at your local wild bird store.
City, state, and national parks are great places to photograph birds. Check out picnic areas. Park visitors sometimes leave food behind, attracting a variety of species. Many birds will hang-out at frequently visited roadside pullouts, where they beg for handouts.
Public zoos provide numerous opportunities for the bird photographer to photograph not only the captive residents, but many species of wild birds that often share meals with the resident population. Bird rehabilitation facilities often allow photographers to photograph their birds. Always make a ōdonationö for their efforts.
I enjoy photographing birds at national wildlife refuges. You may have to work a little harder in a wildlife refuge for your image, but few places are able to provide the variety and sheer numbers of birdlife. With today's pressure on national parks, the refuge system is a "sleeper" whose time has come. It's always good practice to inform refuge personnel of your intentions. This should be your number one priority upon arriving at the refuge. However, don't drive-up and expect refuge personnel to direct you to the closest nesting endangered specie. Call ahead, and advise them of what you would like to do. Besides, certain areas of the refuge may be closed. Most refuges allow individuals to erect a temporary blind. However, permission is granted on a case-by-case basis. Refuge personnel will generally share information that can greatly assist you in your endeavors. Don't hesitate to ask questions. With more than 450 refuges nation wide, there's almost sure to be a refuge near you.
C - Know-How
Know-how ranges from knowing which equipment to purchase and how to use it, to applying different techniques for different subjects.
The most commonly asked question, regarding equipment selection, is "What kind of lens should I buy?" Bird photography dictates the use of a telephoto lens. Just how powerful, depends on the subject, and the shooting conditions. You can get much closer to a Canada goose in a city park, than in a Waterfowl Production Area. A captive bald eagle can be photographed with a 200mm lens. However, you would need a 600mm lens if you intend to photograph sandhill cranes along the Platte River in Nebraska.
If photographing captive birds is your goal, this can be successfully accomplished with a lens in the 200mm to 300mm range. However, photographing wild birds is another story. This is where the 600mm lens comes into its own. Does this mean you have to take out a second mortgage on your home to buy one of the 600mm f/4 bazookas? Not at all. A good 400mm lens with a 1.4x teleconverter will give you 560mm of working power.
When working in close proximity to your subject, from a blind for example, a factor to consider is minimum focal distance. A 500mm lens that allows you to work 10Æ from your subject will give you more frame-filling ability than a 600mm lens that focuses no closer than 15Æ.
Your lens is your most important piece of equipment. Skimp on the purchase of a camera body if necessary. Even purchase a "slower" lens if money is a consideration, such as a 400mm f/5.6, rather than a 400mm f/3.5, or f/2.8. But, ALWAYS purchase top quality glass. If later on, you decide bird photography is not your cup-of-tea, it's always easy to sell quality equipment.
The 35mm system is ideal for bird photography due to its light weight, availability of long lens, and relative low cost. With that in mind, I strongly recommend purchasing a camera body having both autofocus and a motordrive, either built-in or added. Both features will allow you to go home with more ōkeepers.ö
A good sturdy tripod is a necessity. Bogen offers several good tripods for the money. However, if cost is no obstacle, you might consider purchasing one of the models made by Gitzo.
Many bird species are easily photographed from a blind. I have sat for hours in blinds of various types photographing birds. Portable blinds and floating blinds are good. A length of camouflage cloth, netting, or burlap thrown over you works well. Even camo clothing can work when nothing else is available. However, donÆt overlook using your automobile as a blind. It can make a fantastic blind. It will be necessary to find some way to support that long, heavy lens. One solution is the traditional bean bag. However, I find them to have two major shortcomings--they do not provide steady support at slow shutter speeds, and it is practically impossible to make adjustments when using a large zoom lens. That leaves only one alternative, a window mount.
A good solid window mount is one of the best investments you will ever make. Several mounts are available, with some better than others. I prefer the Kirk multi-purpose window mount. I cannot begin to count the number of images made from my car window using a window mount. Remember to turn off the ignition. Otherwise, engine vibrations will be transmitted through your mount, or bean bag, and into your camera, causing blurred images.
Concerning technique, have you ever noticed some bird images contain a tiny white speck in the eye of the subject? It's called catch light. You want it when you can get it. Watch for the catch light to appear as your subject moves its head. That's the moment you want to take the image. If you do not observe catch light when this happens, you might try positioning yourself closer to the ground, requiring you to shoot upward at an angle. This often produces a catch light when nothing else will.
While we're talking about catch light, let's discuss which portion of the anatomy we should focus our lens. In general, focus on the eyes. However, this is not always the case. There are a few things we need to understand, to take into consideration, and they all involve depth of field. The larger your subject appears in the viewfinder, the shallower the depth of field. This has the potential for creating a problem. Have you ever photographed a Bald Eagle, or other large bird, head-on and noticed how the eyes were in sharp focus, but the beak was so blurred the image was practically unusable? Sure, we've all done it.
When you focus on a precise point, it is in sharp focus. However, the area of focus, or depth of field, extends both in front of, and behind that focal point. In fact, the depth of field includes twice the distance behind the focal point, as that in front of it. Therefore, when photographing a subject head-on at close range, take advantage of this phenomenon by focusing about half-way between the eyes and the tip of the beak. This will produce an image with both the eyes and the tip of the beak in focus.
Once you begin photographing birds perched in trees, mixed lighting on a bright sunny day will eventually become a problem. Use fill flash to eliminate those harsh shadows and balance the lighting. The way to accomplish this is to meter on an area in bright sunlight. Using the flash synchronization shutter speed...typically 1/60 sec...determine the correct aperture. If your light meter reads f/5.6, simply set the aperture to f/5.6 and the shutter speed to 1/60 sec. Turn on your flash and youÆre in business.
A shutter speed of 1/250 sec will usually ōstop the actionö of most birds in flight, although 1/500 sec would be better. I often like to use 1/30 sec, or slower, to create the feeling of motion when photographing birds in flight. For this to work, it is necessary to æpanÆ your subject; or in other words, follow your subject with your camera during the exposure. This has the effect of blurring the background, while keeping the subject somewhat in focus.
Nest photography can provide many unique opportunities. However, I have shied away from discussing it in this article simply because most birds will abandon their nests during the incubation phase if repeatedly disturbed. Many show more tolerance after their eggs have hatched. I feel the amount of stress birds experience is probably the same during incubation and during the nestling phase; they simply are more willing to endure the stress while protecting their nestlings.
Do we, as humans, have the right to inflict high levels of stress on another species? Although this is not always a black-and-white issue, in general I would have to say no. Always exercise extreme care when photographing birds, or any species for that matter. No picture is worth more than the well being of your subject. Abandon all efforts the moment any nervous behavior is detected.
One last note. As with many wildlife species, most birds are active in the early morning hours. As they say, itÆs the early bird that gets the worm. ItÆs also the early rising photographer the takes home memorable bird images.
Conclusion
There are almost as many techniques for photographing birds as there are sheer numbers of bird species. The really serious bird photographers devise their own techniques and fabricate their own equipment, using everything from floating muskrat blinds for photographing waterfowl, to artificial lighting and backdrops for photographing hummingbirds, to erecting eighty-foot towers from which to photograph nesting bald eagles. Once you ōknow your subjectö and begin following the ABCs of bird photography, you too will be able to do the same thing. It only takes practice before you will be making impressive images of our feathered friends.
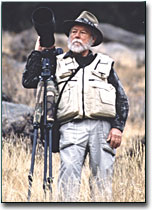 Weldon Lee is a full-time wildlife photographer, writer, and photo tour operator. His work has appeared in numerous magazines including PetersenÆs PHOTOgraphic, OUTDOOR & NATURE Photography, Backpacker, and Mature Outlook. He has two books to his credit, Watchable Birds of the Rocky Mountains, and his latest, A Guide to Photographing Rocky Mountain Wildlife which describes in detail, 325 photo locations throughout the Rocky Mountains from New Mexico to Canada. His photo tour business specializes in wildlife and landscape photography programs from New Mexico to Alaska as well as Florida, Arizona, and the Galapagos Islands. For additional info about his tours, workshops, and seminars, or a signed copy of one of his books, visit Weldons web site, Rocky Mountain Photo Adventures.
Tools of the Trade: Weldon uses Nikon equipment, including an F3 and an N8008s body. His workhorses consist of an AF 80-200mm f/2.8 ED, and a 200-400 f/4 ED, the latter often with a 1.4x converter for increased focal length. A Bogen 3228 tripod with a 3038 ball head gives rock-steady support at slow shutter speeds. He also uses a 28mm, 55mm macro, and a 135mm lens. A Lowepro Photo Trekker AW houses all of his equipment for use in the field.
